Basements are handy things: we use them for storage, as workshops, living spaces, and a setting for scary stories. Useful as they are, basements are also one of the most vulnerable spaces in your home when it comes to flooding. Though there are many potential causes, a common one is sewer water backing up out of the floor drain. These drains aren't only found in basements. Laundry rooms, garages and bathrooms may use floor drains as well, and any of them could act as a pathway for waste water being forced the wrong way through your home's drain pipes.
Among the most inexpensive, simple and effective ways to help prevent the harrowing saga that usually follows is to install a cleverly designed Flood-Guard. The simplicity of the Flood-Guard is attractive, but it's their ease of installation that makes them irresistible. The manufacturer states "a screwdriver and a couple of minutes are all you need", and it's true!
Flood Guards are offered in two distinctively different styles, a float type and a standpipe version.
Whether you're installing a float or standpipe model, first thing's first: remove the strainer or other cover from the floor drain.
Float Model

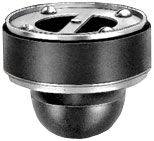
Float Style Flood Guard
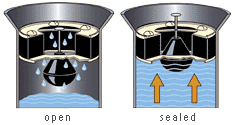
Essentially a check valve for your floor drain, the Flood-Guard float model features a rubber float that is pushed up into the drain opening when water begins to rise up from below, sealing off the drain and protecting your home from minor to moderate backup situations. Whenever water threatens from below, the float will seal off the entrance it seeks. Flood guards are designed to fit common 2", 3" or 4" drain sizes.
 How The Float Style Works
To install the Float Model, you may wish to slightly pre-tighten the screws on the Flood-Guard beforehand to expand the outer gasket. If your pipe has a slightly larger diameter, this will help the unit from falling too far down the pipe. You could also use a string, wire or hook to lower the Flood-Guard into place, or simply hold the float rod. Lower the Flood-Guard into the pipe, making sure that it's low enough with the float pushed up for the strainer/cover to fit back over the drain, flush with the floor.
Once the unit is down deep enough, tighten the screws at the top to create a snug seal within the pipe. Put a few drops or dabs worth of oil or grease (silicone grease or faucet grease) on the float rod and the hole at the top of the unit. Replace the strainer/cover on the drain, and wash your hands. It's over, you're finished.
Standpipe Model

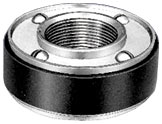
Standpipe Model Flood Guard
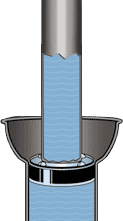
The Flood-Guard standpipe version without a float is available for 3" and 4" drains. The standpipe models are recommended for more extreme or extended pressure situations. In the event of a backup, water rises up the inside of the pipe. The length of the standpipe can be made the length you determine you will need it to be to offer the best possible protection for your situation. Your standpipe height should be higher than the highest point of flooding elevation you have experienced.
However, in some geological locations and severe flood conditions, your basement may need to flood to equalize the pressure inside your basement walls to that of the pressure against the outside walls caused by excessive groundwater. Standpipes that are too long run the risk of preventing the basement from flooding when it's absolutely needed to prevent walls or floors from cracking or the possible collapse of the basement walls. We strongly suggest you consult local codes or an expert to determine the ideal height for your standpipe in your area.
 How The Standpipe Model Works
To install the 3" standpipe version, the Flood Guard has a rubber gasket the standpipe is inserted into and both are then lowered into the drain pipe. The screws are fully tightened once it has been lowered inside the drain pipe to ensure a tight seal. The rubber gasket will receive 1-½" PVC, ABS, galvanized or other iron pipe sized piping like stainless steel or brass. The standpipe must not have an outside diameter greater than 2"
The 4" standpipe model is threaded, and takes 1-½" IPS pipe, galvanized, stainless steel, brass and ABS or PVC male adapters. The standpipe can be connected before or after the Flood-Guard's screws are tightened into the drain.
Be sure to highlight the location of each standpipe with bright tape, ribbon or something else - they can be difficult to see, and far too easy to walk into or trip over.
Summary
Now that you know how to install a Flood-guard, you have another barrier against flooding. Flood-Guards are affordable and easy to install, but they should not be your only protection against flooding. We offer many flood-prevention products and urge you to look at all of the flood-prevention products currently available and come up with your own perfect combination. An ounce of prevention is certainly worth a pound of cure.
